
If your vehicle is not running smoothly or you notice a drop in performance, your fuel filter might be the culprit. Knowing how to remove the fuel filter yourself can save you time and money, and keep your engine running clean and efficient.
In this guide, you’ll find simple, step-by-step instructions that anyone can follow—no mechanic needed. By the end, you’ll feel confident handling this important maintenance task and avoid costly repairs down the road. Ready to get started? Let’s dive in and clear the way for better fuel flow in your vehicle.
Credit: www.yourmechanic.com
Tools Needed
Removing a fuel filter requires the right tools. Using proper tools makes the job easier and safer. Without them, you might damage parts or waste time.
Gathering tools before starting helps avoid interruptions. Each tool has a specific role. Knowing their use improves your work quality.
Wrench Set
A wrench set helps loosen bolts and fittings. Fuel filters often use different sizes of nuts. A set with multiple sizes covers all possibilities.
Screwdrivers
Screwdrivers remove clamps or covers on the fuel filter. Flathead and Phillips types are common. Having both types ready saves time.
Fuel Line Disconnect Tool
This tool safely detaches the fuel lines. It prevents damage to plastic connectors. Using it avoids fuel leaks and injuries.
Drain Pan
A drain pan catches fuel that spills out. It keeps your workspace clean. Using a pan also protects the environment from spills.
Safety Gloves
Gloves protect your hands from fuel and sharp parts. They improve grip on tools and parts. Always wear gloves for safety.
Safety Glasses
Safety glasses shield your eyes from fuel splashes. They protect from dust and debris too. Eye protection is important during all steps.
Safety Precautions
Removing a fuel filter requires careful attention to safety. Fuel is highly flammable and can cause serious injury. Taking the right precautions helps protect you and your vehicle.
Before starting, prepare your workspace and wear proper safety gear. Avoid sparks and open flames near the vehicle. Follow these steps to stay safe while removing the fuel filter.
Wear Protective Clothing
Wear safety glasses to protect your eyes from fuel splashes. Use gloves to keep your hands safe from harmful chemicals. Long sleeves and pants reduce skin exposure.
Work In A Well-ventilated Area
Fuel fumes can build up and cause breathing problems. Open doors and windows to allow fresh air inside. Avoid working in closed spaces without ventilation.
Fuel lines stay pressurized after the engine stops. Release pressure before disconnecting the filter. This prevents fuel spray and reduces fire risk.
Keep Fire Extinguisher Nearby
Have a fire extinguisher ready in case of emergency. Choose one rated for flammable liquids. Know how to use it before starting work.
Disconnect Battery
Remove the negative battery cable to stop electrical sparks. This lowers the chance of igniting fuel vapors. Always disconnect the battery before fuel work.
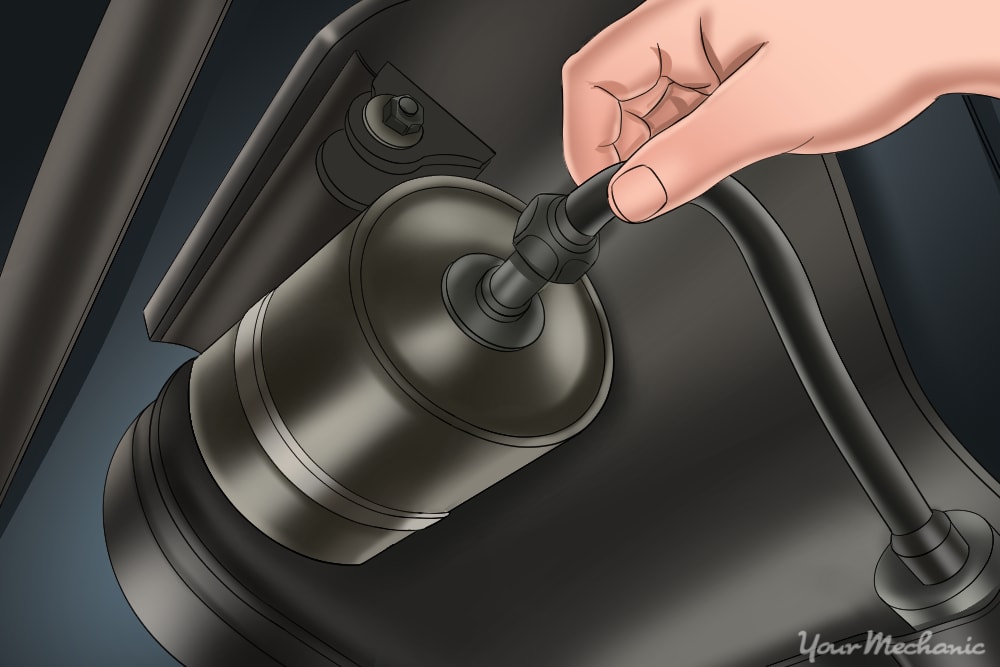
Locate The Fuel Filter
Finding the fuel filter is the first step to removing it safely. The fuel filter cleans dirt and rust from the fuel. This keeps your engine running smoothly. Knowing its location saves time and effort during replacement.
Fuel filters can be in different places depending on the vehicle. Some are easy to reach, while others need a bit of searching. A little knowledge goes a long way here.
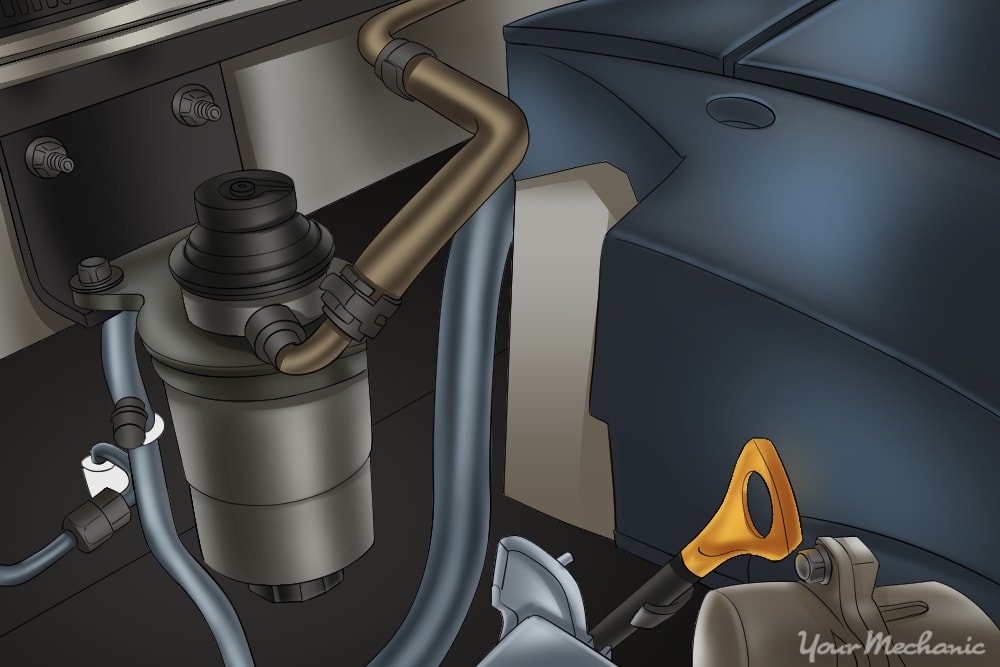
Check Under The Hood
Most fuel filters sit under the hood near the engine. Look for a small, metal or plastic cylinder. It connects to the fuel lines with clamps or fittings. Often, it is near the fuel injectors or the firewall.
Inspect Along The Fuel Line
Some fuel filters are located along the fuel line under the car. Check beneath the vehicle, near the fuel tank or along the frame rails. Use a flashlight to see clearly in dark areas.
Consult The Owner’s Manual
The vehicle’s manual shows the exact fuel filter location. Look in the maintenance or engine section. This can save guessing and prevent damage while searching.
Look For Quick-disconnect Fittings
Many modern fuel filters use quick-disconnect fittings. These fittings snap off without tools. Spotting them helps identify the fuel filter quickly.

Credit: www.wikihow.com
Prepare The Vehicle
Preparing your vehicle before removing the fuel filter is very important. It helps you work safely and avoid damage. Take your time to get everything ready. Follow these simple steps to prepare your vehicle properly.
Park The Vehicle On A Flat Surface
Find a flat, stable area to park your vehicle. This prevents it from rolling while you work. Use the parking brake to keep the vehicle steady. A level surface makes the process easier and safer.
Turn Off The Engine And Let It Cool
Switch off the engine and wait for it to cool down. Hot parts can cause burns or start a fire. Cool the engine for at least 30 minutes before you start. Safety first.
Disconnect The Battery
Remove the negative cable from the battery terminal. This stops electrical sparks during the work. Sparks near fuel can be very dangerous. Always disconnect the battery before handling fuel parts.
Relieve The Fuel System Pressure
Fuel systems hold pressure that must be released safely. Locate the fuel pump fuse and remove it. Start the engine and let it run until it stops. This releases pressure in the fuel lines. Replace the fuse after pressure is gone.
Gather Necessary Tools And Safety Gear
Prepare tools like wrenches, screwdrivers, and pliers. Wear safety glasses and gloves to protect yourself. Keep a fire extinguisher nearby for emergencies. Being ready helps you finish the job smoothly.
Relieve Fuel System Pressure
Before removing the fuel filter, it is important to relieve the fuel system pressure. Fuel systems hold pressure that can spray fuel when disconnected. This step helps avoid fuel spills and reduces fire risk. It also protects your eyes and skin from fuel contact.
Relieving the fuel system pressure is a simple process. It prepares the system for safe filter removal. Follow the steps carefully for best results.
Locate The Fuel Pump Fuse Or Relay
Start by finding the fuel pump fuse or relay in the fuse box. Your vehicle’s manual can help locate it. Removing this fuse or relay stops the fuel pump from working.
Start The Engine And Let It Stall
Turn the ignition key to the “on” position. Do not start the engine. Wait for a few seconds to let the fuel pressure drop. Then try to start the engine. It should stall quickly, showing pressure release.
Disconnect The Negative Battery Cable
Use a wrench to disconnect the negative battery cable. This prevents accidental sparks while working on the fuel system. It also stops the fuel pump from running.
Depressurize The Fuel Lines
Locate the fuel line quick-connect fittings near the filter. Use a rag to catch any fuel drips. Press the release tabs or use a special tool to disconnect the lines. Fuel may spray slightly; work carefully.
Disconnect Fuel Lines
Disconnecting the fuel lines is a key step in removing the fuel filter. The fuel lines carry gasoline from the tank to the engine. These lines can be under pressure, so safety is important. Follow clear steps to avoid spills and damage.
Start by relieving pressure in the fuel system. This reduces fuel spray when disconnecting lines. Locate the fuel pump fuse or relay. Remove it and run the engine until it stops. This empties fuel from the lines safely.
Gather Proper Tools
Use the correct tools to disconnect fuel lines. A fuel line disconnect tool or pliers may be needed. Gloves and safety glasses protect you from fuel. Prepare a container or rags to catch any spilled fuel.
Identify Fuel Line Connections
Locate the fuel lines connected to the filter. They are usually secured with clips or quick-connect fittings. Inspect the connections carefully to understand how to release them. Avoid forcing the lines to prevent damage.
Disconnect Fuel Lines Carefully
Press or squeeze the clips to release the lines. Pull the fuel lines straight off the filter fittings. Keep the lines upright to avoid spilling fuel. Cap the lines or cover openings to stop dirt entry.
Remove The Old Fuel Filter
Removing the old fuel filter is an important step in vehicle maintenance. It keeps the fuel system clean and the engine running smoothly. This process needs care and the right tools.
Old fuel filters can clog and reduce fuel flow. This causes poor engine performance and lower fuel efficiency. Replacing the filter helps avoid these problems.
Prepare Your Work Area And Tools
Start by parking the car on a flat surface. Turn off the engine and let it cool down. Gather tools like wrenches, gloves, and a container for fuel spills.
Find the fuel pump fuse and remove it. Start the engine and let it run until it stops. This releases pressure and prevents fuel spray.
Check your car manual for the exact location. Most filters are near the fuel tank or engine bay. Clean the area around the filter to avoid dirt entering the system.
Disconnect Fuel Lines Carefully
Wear gloves and eye protection. Use a wrench to loosen the fittings. Catch any fuel in a container to avoid spills. Avoid bending or damaging the fuel lines.
Loosen the mounting bracket or screws holding the filter. Pull the filter out gently. Check for cracks or damage in the filter housing.
Install The New Fuel Filter
Installing the new fuel filter is a critical step. It ensures clean fuel reaches your engine. Proper installation prevents leaks and keeps your vehicle running smoothly.
Follow each step carefully. Take your time to avoid mistakes. This will help your vehicle perform better and last longer.
Prepare The New Fuel Filter
Check the new filter for any damage. Compare it to the old one. Make sure it matches in size and shape. Remove any protective caps on the filter ends.
Attach The Fuel Lines
Connect the fuel lines to the new filter. Push them firmly onto the filter’s inlet and outlet. Listen for a click or feel a secure fit. Loose lines can cause leaks.
Secure The Fuel Filter In Place
Place the fuel filter back in its bracket. Use the original clamps or fasteners. Tighten them just enough to hold the filter firmly. Avoid over-tightening, which can damage parts.
Double-check All Connections
Inspect each connection carefully. Ensure the fuel lines are tight and aligned. Look for any signs of fuel leaks. Fix any loose connections before moving on.
Test The Installation
Turn the ignition key to the “on” position. This allows fuel to flow through the new filter. Watch for leaks around the filter. Start the engine and check again for leaks or unusual sounds.
Reconnect Fuel Lines
After removing the old fuel filter, the next step is to reconnect the fuel lines. This step is important to ensure your vehicle runs smoothly. Proper connection prevents leaks and keeps fuel flowing correctly.
Identify The Correct Fuel Lines
First, find the fuel lines that connect to the filter. Usually, there are two lines: one for fuel entering and one for fuel leaving. Check for any markings or shapes that help match the lines to the right ports.
Attach Fuel Lines Securely
Push each fuel line firmly onto the filter’s ports. Make sure the lines fit tight and do not wiggle. Loose connections can cause fuel leaks or engine problems.
Use Clamps To Hold Lines
Place clamps over the fuel lines at the connection points. Tighten the clamps to hold the lines in place. Clamps stop the lines from slipping off during driving.
Double-check Connections
Look over all connections once more. Wiggle the lines gently to test security. Confirm there are no gaps or loose ends before moving on.
Check For Leaks
Checking for leaks is a key step after removing and replacing the fuel filter. Leaks can cause fuel loss, bad engine performance, and even fire hazards. Always inspect the area carefully to keep your vehicle safe and running well.
Visual Inspection Of Fuel Lines
Look closely at the fuel lines around the filter. Check for cracks, splits, or wet spots. Any sign of fuel around connections means a leak is present. Fix leaks before starting the engine.
Use A Clean Rag To Detect Leaks
Wipe the fuel filter and nearby pipes with a dry cloth. Look for fresh fuel stains on the rag. This method helps find small leaks that are hard to see with the eye.
Start The Engine And Observe
Turn the engine on for a few minutes. Watch the fuel filter area carefully. Fuel should not drip or spray out. If you see any fuel, turn the engine off immediately.
Check Fuel Pressure
Use a fuel pressure gauge to test the system. Low pressure might mean a leak or blockage. Make sure the pressure matches your vehicle’s specifications.
Test The Vehicle
Testing the vehicle after removing the fuel filter is crucial. It ensures the fuel system works correctly. This step confirms no leaks and proper fuel flow. The vehicle’s performance depends on it.
Start The Engine
Turn the key to start the engine. Listen for any unusual noises. The engine should start smoothly without hesitation. If it struggles, check the fuel filter connection again.
Check For Fuel Leaks
Look under the vehicle for any fuel leaks. Pay close attention near the fuel filter area. Any wet spots or fuel smells indicate a leak. Tighten connections or replace parts if necessary.
Monitor Engine Performance
Drive the vehicle slowly and listen carefully. The engine should run without sputtering or stalling. Watch for any loss of power or rough idling. Good engine performance shows the fuel filter works well.
Credit: www.yourmechanic.com
Frequently Asked Questions
What Tools Do I Need To Remove A Fuel Filter?
To remove a fuel filter, you need a wrench, screwdrivers, and safety gloves. Some filters require special disconnect tools for fuel lines. Always consult your vehicle manual for specific tools. Proper tools ensure a safe and efficient removal process.
How Do I Locate The Fuel Filter In My Car?
Fuel filters are usually found along the fuel line, near the fuel tank or engine. Check under the car or in the engine bay. Consult your vehicle’s manual or online guides for exact locations. Locating it correctly saves time during removal.
Can I Remove The Fuel Filter Without Draining Fuel?
It’s best to relieve fuel system pressure before removing the filter to avoid spills. Some filters can be removed without draining, but safety precautions are necessary. Use protective gear and catch any fuel leakage during removal.
How Often Should I Replace The Fuel Filter?
Most manufacturers recommend replacing the fuel filter every 20,000 to 40,000 miles. Check your vehicle’s manual for specific intervals. Regular replacement ensures clean fuel flow and prevents engine issues caused by clogged filters.
Conclusion
Removing the fuel filter helps keep your engine running smoothly. Clean filters stop dirt from reaching important parts. Follow the steps carefully and take your time. Use proper tools and safety measures to avoid problems. Regular filter changes improve fuel flow and engine life.
You can save money by doing this yourself. Remember, a clean fuel filter means better car performance. Keep your vehicle healthy with this simple task.


