

If your car’s brakes are making noise or you feel a vibration when stopping, it’s time to check your rear disc brake pads and rotors. Knowing how to replace them yourself can save you time and money, and give you confidence in your vehicle’s safety.
In this guide, you’ll learn simple, step-by-step instructions to replace your rear brake pads and rotors quickly and safely. By the end, you’ll understand exactly what to do, even if you’ve never done brake work before. Keep reading to take control of your car’s braking system and drive with peace of mind.
Tools And Materials Needed
Replacing rear disc brake pads and rotors requires the right tools and materials. Using proper equipment makes the job easier and safer. Prepare everything before starting to avoid delays or mistakes.
Essential Tools
You need a jack and jack stands to lift and hold the car. A lug wrench helps remove wheel nuts. A socket set and ratchet are necessary to take off brake calipers. A C-clamp or brake piston tool pushes back the caliper piston. A flathead screwdriver or pry bar helps remove old pads. Brake cleaner spray removes dust and dirt from parts.
Replacement Parts
Buy the correct rear brake pads for your vehicle model. Choose rotors that match the car’s make and size. Some kits include both pads and rotors for convenience. Inspect parts for quality and fit before starting.
Safety Gear
Wear safety glasses to protect your eyes from dust and debris. Use gloves to keep your hands clean and safe. A dust mask helps avoid breathing brake dust. Proper clothing prevents injury and keeps you comfortable during work.
Preparing Your Vehicle
Preparing your vehicle is the first step to replacing rear disc brake pads and rotors. Proper preparation keeps you safe and makes the job easier. Follow these simple steps carefully before starting the repair.
Each step ensures your vehicle is stable and ready for work. Take your time and follow the instructions closely.
Parking And Securing
Park your car on a flat, solid surface. Avoid slopes or uneven ground. Apply the parking brake firmly. This stops the vehicle from moving. Place wheel chocks in front of the front tires. This adds extra safety. Never skip this step.
Loosening Lug Nuts
Before lifting the vehicle, loosen the lug nuts on the rear wheels. Use a lug wrench to turn them counterclockwise. Do not remove them completely yet. Just break the tightness. This step makes removing the wheels easier later.
Lifting The Vehicle
Find the correct jacking point under the rear of the car. Use a reliable floor jack to lift the vehicle. Raise it high enough to remove the rear wheels easily. Secure the vehicle with jack stands. Never rely on the jack alone for support.
Removing The Wheel
Removing the wheel is the first key step to access the rear disc brake pads and rotors. It requires care and the right tools to avoid damage. Follow each step carefully to make the process smooth and safe.
Taking Off The Lug Nuts
Start by loosening the lug nuts. Use a lug wrench that fits the nuts well. Turn the wrench counterclockwise to loosen each nut. Do this while the car is still on the ground. This prevents the wheel from spinning. Do not fully remove the nuts yet; just loosen them enough to turn by hand later.
Next, lift the car using a jack placed at the right lifting point. Raise the car until the wheel is off the ground. Now, fully unscrew the lug nuts and keep them safe. Pull the wheel straight off the hub. Set the wheel aside carefully. This clears the way to access the brake parts easily.
Accessing The Brake Assembly
Accessing the brake assembly is the first step in replacing rear disc brake pads and rotors. It allows you to reach the parts that need changing. Proper access ensures a safe and smooth repair process. Follow these steps carefully to avoid damage or injury.
Locating The Brake Caliper
The brake caliper holds the brake pads in place. It sits over the rotor, near the wheel hub. To find it, look behind the wheel where the disc rotor is visible. The caliper is a metal clamp-like part attached to the rotor.
Removing Caliper Bolts
Caliper bolts keep the caliper attached to the wheel assembly. Use a wrench or socket to loosen these bolts. Turn them counterclockwise until they come off. Keep the bolts safe for reinstallation later.
Supporting The Caliper
Once the bolts are off, the caliper will be loose. Do not let it hang by the brake hose. Use a hook or strong wire to hang the caliper on the suspension. This prevents damage to the brake line and makes the job easier.
Removing Old Brake Pads And Rotors
Removing old brake pads and rotors is the first step in replacing your rear disc brakes. This process clears the way for new parts to work correctly. Proper removal helps avoid damage to other brake components.
Take your time and use the right tools. Safety is important. Make sure the car is stable and cool before starting. Follow each step carefully for a smooth brake replacement.
Extracting Brake Pads
Start by removing the caliper bolts with a wrench. Lift the caliper carefully and support it so it does not hang by the brake hose.
Slide the old brake pads out from the caliper bracket. They may be stuck due to dirt or rust. Use a flat tool to pry them gently if needed.
Check the pads for uneven wear or deep grooves. Old pads should be removed fully to fit new ones properly.
Detaching The Rotor
Remove any screws or clips holding the rotor in place. Sometimes, rotors stick due to rust or dirt buildup. Tap the rotor gently with a rubber mallet to loosen it.
Pull the rotor away from the wheel hub. If it does not come off easily, check for hidden fasteners or corrosion. Clean the hub surface before installing a new rotor.
Inspecting Components
Look closely at the caliper, brake lines, and hardware. Check for leaks, cracks, or worn parts. Replace any damaged components to ensure brake safety.
Clean the caliper slides and lubricate them with brake grease. Proper maintenance extends the life of your brake system.
Inspect the rotor surface for deep grooves or warping if you plan to reuse it. Smooth rotors help new pads last longer and work better.
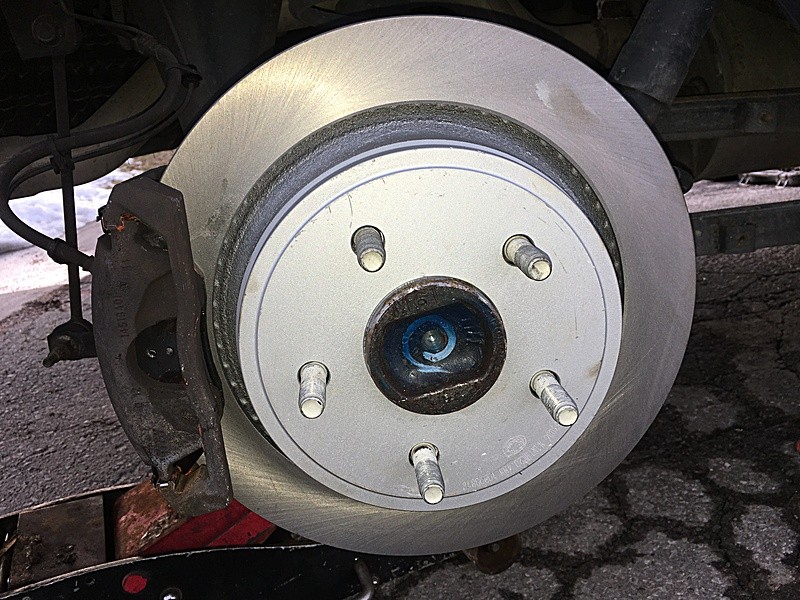
Credit: www.allrotors.com
Installing New Rotors
Installing new rotors is a key step in replacing rear disc brake pads and rotors. Proper installation ensures smooth braking and extends the life of your brake system. Follow these steps carefully to avoid common problems like noise or uneven wear.
Cleaning The Hub
Start by cleaning the hub surface where the rotor sits. Use a wire brush or sandpaper to remove rust and dirt. A clean hub helps the rotor fit tightly and prevents wobbling during braking.
Positioning The Rotor
Place the new rotor on the cleaned hub. Align the holes in the rotor with the wheel studs or mounting points. Make sure the rotor sits flat against the hub without any gaps.
Securing The Rotor
Secure the rotor by tightening the screws or bolts that hold it in place. Use a torque wrench to tighten them to the manufacturer’s recommended settings. Proper torque prevents the rotor from moving or becoming loose while driving.
Fitting New Brake Pads
Fitting new brake pads is a key step in replacing rear disc brake pads and rotors. It ensures your brakes work safely and smoothly. The process needs care and the right tools. Follow each step carefully to avoid damage and keep your brakes strong.
Compressing The Caliper Piston
Start by pushing the caliper piston back into its housing. This creates space for the new, thicker brake pads. Use a C-clamp or a caliper tool to press the piston slowly. Avoid forcing it quickly to prevent damage. Check the brake fluid reservoir before compressing. If it is full, remove some fluid to avoid overflow.
Inserting New Pads
Place the new brake pads into the caliper bracket. Make sure the friction surface faces the rotor. The pads should fit snugly without forcing them. Some pads come with clips or shims—install them as needed. Double-check the position to avoid uneven wear or noise later.
Reattaching The Caliper
Carefully slide the caliper back over the new brake pads. Align it with the mounting bolts. Tighten the bolts firmly but do not overtighten. Ensure the caliper moves freely and does not bind. After reattaching, pump the brake pedal a few times. This sets the pads against the rotor and restores brake pressure.

Credit: www.2carpros.com
Reassembling The Wheel
Reassembling the wheel is the final step after replacing rear disc brake pads and rotors. It restores the wheel to its proper position and ensures safe driving. Take your time to mount the wheel correctly and secure it well. Careful reassembly prevents vibrations and keeps your brakes effective.
Mounting The Wheel
Lift the wheel and align it with the wheel hub. Make sure the holes in the wheel match the studs on the hub. Gently slide the wheel onto the studs without forcing it. Hold the wheel firmly against the hub to keep it from moving.
Hand-tightening Lug Nuts
Place the lug nuts on the studs by hand. Turn each nut clockwise to start threading. Tighten them as much as you can using only your fingers. This ensures the wheel sits evenly and avoids cross-threading. Hand-tightening prepares the wheel for final tightening with a wrench.
Lowering The Vehicle And Final Steps
After installing new rear disc brake pads and rotors, it is time to lower the vehicle and finish the job. This step is important for safety and performance. Follow these simple actions carefully to complete the brake replacement process.
Lowering The Jack
Slowly lower the jack to bring the vehicle back down. Do this carefully to avoid sudden drops. Make sure the vehicle sits firmly on the ground before removing the jack. Never work under a car that is not fully supported.
Tightening Lug Nuts Fully
Once the vehicle is down, tighten the lug nuts completely. Use a wrench and tighten in a star pattern. This ensures even pressure and secures the wheel properly. Check each nut twice for safety.
Testing The Brakes
Before driving, test the brakes carefully. Press the brake pedal several times to feel firmness. Take a short, slow drive to check brake response. Listen for unusual noises and ensure smooth braking.
Maintenance Tips
Proper maintenance keeps your rear disc brakes working well. It helps avoid costly repairs and improves safety. Follow these tips to keep pads and rotors in top shape.
Break-in Procedure
New brake pads and rotors need to settle. Drive slowly and stop gently at first. Repeat this for about 100 miles. This process helps brakes perform better and last longer.
Regular Inspection
Check brake pads and rotors often. Look for cracks, rust, or thin pads. Clean dust and dirt from the brake area. Regular checks catch problems early and keep brakes safe.
Signs Of Wear
Listen for squealing or grinding sounds. Feel if brakes pull to one side. Notice if stopping distance grows longer. These signs mean it’s time to replace pads or rotors.

Credit: www.youtube.com
Frequently Asked Questions
How Do I Know When To Replace Rear Brake Pads?
You should replace rear brake pads when they are less than 3mm thick. Also, listen for squealing sounds or reduced braking efficiency. Regular inspection helps avoid damage to rotors and ensures safe driving.
Can I Replace Rear Rotors Without Changing Pads?
It is not recommended to replace rotors without changing brake pads. Worn pads can damage new rotors quickly. Always replace both parts together for optimal braking performance and safety.
What Tools Are Needed To Replace Rear Brake Pads And Rotors?
You need a jack, lug wrench, socket set, C-clamp, brake cleaner, and new brake pads and rotors. Having these tools ensures a smooth and efficient brake replacement process.
How Long Does It Take To Replace Rear Brake Pads And Rotors?
Replacing rear brake pads and rotors typically takes 1 to 2 hours. Time depends on your experience and tools availability. Proper care and patience are key for a successful brake job.
Conclusion
Replacing rear disc brake pads and rotors can save money and time. Follow each step carefully for safety and good results. Take your time and use the right tools. Check your work before driving to ensure everything fits well. Regular brake maintenance keeps your car safe on the road.
Simple care prevents bigger problems later. Now, you can handle this task with confidence and keep your brakes working smoothly.


