Are your brakes feeling less smooth or making strange noises? Worn-out or uneven brake rotors could be the reason.
Instead of rushing to the mechanic and spending a lot, you can save time and money by resurfacing your brake rotors right at home. Imagine getting that fresh, smooth braking experience without stepping into a shop. In this guide, you’ll discover simple, step-by-step instructions to bring your rotors back to life safely and effectively.
Ready to take control of your car’s performance and your wallet? Let’s dive in and make your brakes feel like new again.
Tools And Materials Needed
Resurfacing brake rotors at home requires the right tools and materials. Having everything ready makes the job easier and safer. This section lists what you need before starting the process.
Essential Tools
Start with a good floor jack to lift your car safely. Use jack stands to support the vehicle securely. A lug wrench will remove the wheel nuts.
Brake caliper tools help remove the caliper and pads. A rotor resurfacing machine or a hand-held brake lathe is necessary to smooth the rotor surface. You also need a socket set for various bolts.
Recommended Materials
Brake cleaner helps remove dirt and grease from the rotors. Use sandpaper or emery cloth for minor surface cleaning. Anti-seize lubricant prevents parts from sticking together after reassembly.
New brake pads are a good idea when resurfacing rotors. Use a clean rag or shop towels to wipe off dust and debris. Keep a container for small bolts and nuts to avoid losing them.
Safety Gear
Wear safety glasses to protect your eyes from dust and debris. Use gloves to keep your hands safe and clean. A dust mask prevents inhaling brake dust, which can be harmful.
Wear closed-toe shoes to protect your feet. Work in a well-ventilated area to avoid breathing in fumes from cleaners and dust.

Credit: www.reddit.com
Preparing Your Workspace
Preparing your workspace is the first step to resurface brake rotors at home. A clean and organized area helps you work faster and safer. It also keeps your tools easy to find. Take time to set up a good place before starting the job.
Choosing A Suitable Location
Pick a flat, well-lit area to work on your brake rotors. A garage or driveway works best. Make sure the spot has enough room to move around freely. Avoid places with dust or dirt that can get into your parts. Good lighting helps you see small details clearly.
Organizing Tools
Gather all necessary tools before starting. Place them on a clean table or bench. Keep items like a brake lathe, sandpaper, and cleaning cloths within reach. Organize the tools by use to avoid confusion. This saves time and reduces mistakes during the work.
Ensuring Safety Measures
Wear protective gear such as gloves and safety glasses. Make sure your workspace has good ventilation. Keep a fire extinguisher nearby, just in case. Clear the area of any flammable materials. Safety helps you avoid accidents and work with confidence.
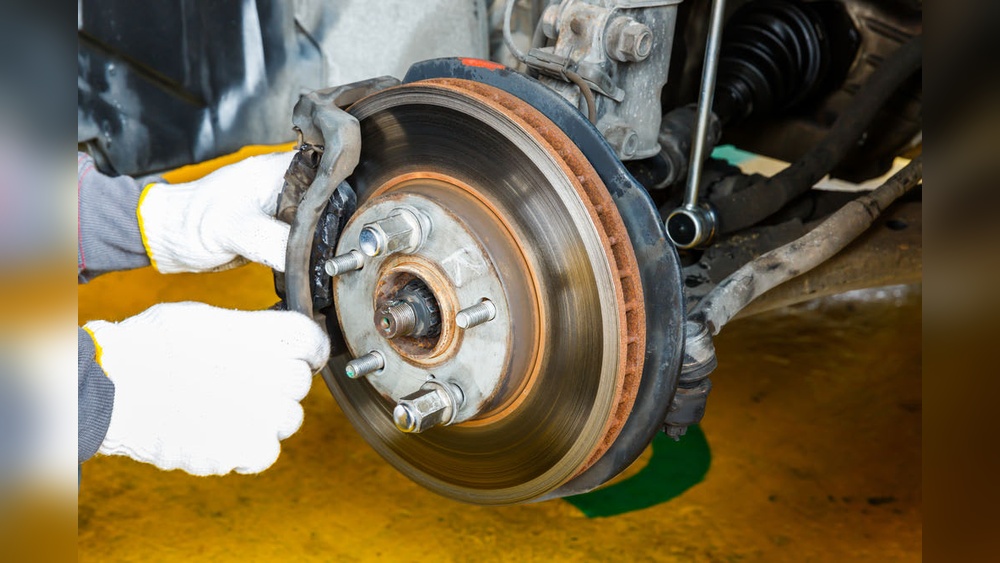
Removing The Brake Rotors
Removing the brake rotors is the first step to resurface them at home. This process requires some basic tools and safety precautions. Each part must come off carefully to avoid damage. Understanding each step helps make the job easier and safer.
Lifting The Vehicle
Start by parking on a flat surface. Use a jack to lift the car at the recommended jacking points. Place jack stands under the car for safety. Never rely only on the jack. Make sure the car is stable before working underneath.
Removing The Wheel
Loosen the lug nuts with a wrench before lifting the car. After lifting, remove the lug nuts completely. Take the wheel off and set it aside. This exposes the brake parts for easier access.
Detaching The Brake Caliper
Locate the bolts holding the brake caliper. Use a socket wrench to remove these bolts carefully. Hang the caliper using a wire or hook to avoid strain on the brake hose. Do not let the caliper hang freely by the hose.
Taking Off The Rotor
Some rotors are secured with screws; remove these first. If the rotor is stuck, tap it gently with a rubber mallet. Pull the rotor straight off the hub. Clean the hub surface before installing the resurfaced rotor.

Credit: www.youtube.com
Inspecting The Rotors
Inspecting the brake rotors is a key step before resurfacing them at home. It helps you decide if the rotors can be safely resurfaced or if they need replacement. Careful inspection ensures your brakes work well and stay safe on the road.
Checking For Damage
Look closely at the rotor surface for cracks, deep grooves, or rust spots. Small marks are normal, but big damage means the rotor is unsafe. Cracks can cause brake failure. Any visible damage often means replacement is better than resurfacing.
Measuring Rotor Thickness
Use a micrometer to measure the rotor thickness at several points. Compare these numbers to the minimum thickness listed by the vehicle maker. Rotors thinner than this limit should not be resurfaced. Thin rotors can warp or break during use.
Determining Resurfacing Viability
Check if the rotor surface is uneven or has minor wear. If the rotor thickness is above the limit and damage is minimal, resurfacing is possible. Rotors with deep damage or below minimum thickness must be replaced. This step saves money and keeps braking safe.
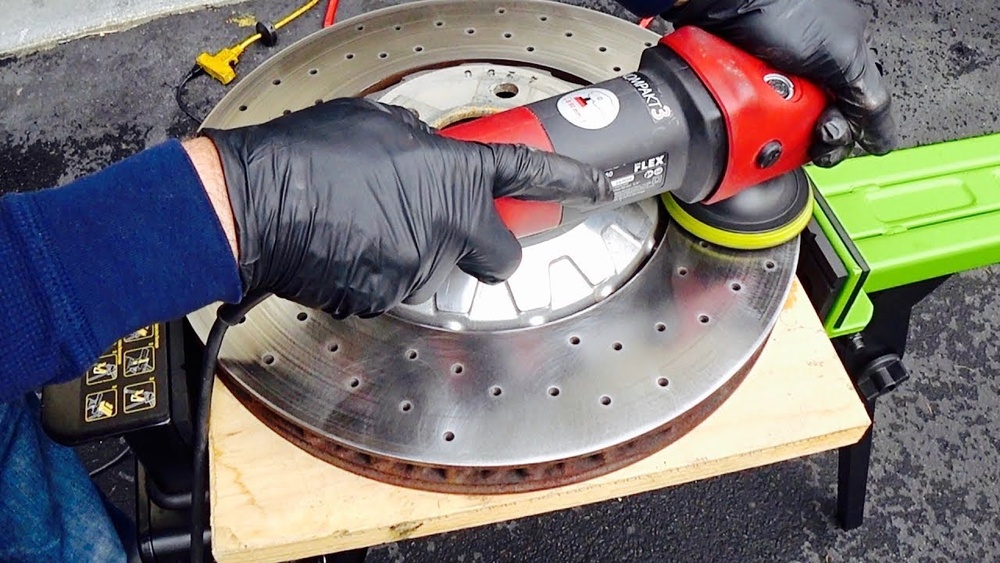
Resurfacing The Rotors
Resurfacing the rotors is a key step in brake maintenance. It helps restore a smooth surface for better braking. Proper resurfacing can extend the life of your rotors. It also improves safety and reduces noise. This process removes unevenness and small grooves caused by wear.
Performing this task at home saves money and gives you control over the quality. The main goal is to remove just enough material to make the surface flat and even again. Avoid removing too much, as it can weaken the rotor.
Setting Up The Lathe Or Sandpaper
Begin by securing the rotor firmly. Use a lathe if available. It provides a precise and even cut. Set the lathe speed to a moderate level to avoid overheating. If you lack a lathe, use fine-grit sandpaper. Wrap it around a flat block for better control. Always wear safety gear to protect your eyes and hands.
Evenly Removing Surface Material
Apply gentle, consistent pressure on the rotor surface. Move the lathe or sandpaper evenly across the entire rotor. Check frequently for a smooth, flat finish. Removing material evenly prevents vibrations and brake pulsation. Stop once the surface looks clean and uniform.
Smoothing Edges
After resurfacing, check the rotor edges. Sharp or rough edges can cause damage and noise. Use a fine file or sandpaper to smooth these edges carefully. Make sure the edges feel rounded and safe to touch. Clean the rotor to remove any dust before reinstalling.

Credit: www.reddit.com
Cleaning And Reinstalling Rotors
Cleaning and reinstalling brake rotors is a crucial step after resurfacing. It ensures the parts work well and last longer. Dirt or dust left on the rotor can cause problems. Proper reinstallation keeps the brake system safe and effective. Follow each step carefully to get the best results.
Removing Debris And Dust
Use a clean cloth or brush to wipe the rotor surface. Remove all dust and small metal pieces. You can also use brake cleaner spray for better cleaning. Make sure the rotor is dry before reinstalling. Clean rotors improve brake performance and reduce noise.
Reattaching The Rotor And Caliper
Place the rotor back on the wheel hub carefully. Align the holes for the bolts perfectly. Next, reattach the brake caliper over the rotor. Tighten the caliper bolts securely but do not overtighten. Check that the rotor spins freely without rubbing.
Securing The Wheel
Put the wheel back onto the hub. Screw the lug nuts by hand to avoid cross-threading. Use a wrench to tighten the nuts in a star pattern. This method ensures even pressure on the wheel. Lower the car and tighten the lug nuts fully with a torque wrench.
Testing Brake Performance
Testing brake performance after resurfacing brake rotors is important. It ensures your brakes work safely and correctly. Proper testing helps spot any issues early. It also confirms the resurfacing was done well. Follow these steps to check your brake system at home.
Conducting A Brake Test
Start by driving slowly in a safe area. Apply the brakes gently at first. Notice how the car slows down. Increase pressure on the brake pedal gradually. The car should stop smoothly and steadily. Avoid sudden or harsh braking. Repeat this process several times for accuracy.
Listening For Unusual Noises
Pay close attention to sounds during braking. Grinding, squeaking, or clicking noises can mean a problem. These sounds may show the rotor is uneven or damaged. Quiet brakes usually mean the resurfacing was successful. If noises persist, inspect the brake system again.
Monitoring Brake Response
Check how the brake pedal feels under your foot. It should feel firm and stable, not soft or spongy. Notice if the car pulls to one side when braking. Uneven response can indicate rotor or pad issues. Consistent and balanced braking means the rotors are working well.
Maintenance Tips For Longevity
Maintaining brake rotors well helps them last longer and work better. Simple care steps keep rotors smooth and safe. Regular checks and good driving habits prevent damage and costly repairs. Knowing when to replace rotors keeps your brakes reliable and strong.
Regular Inspections
Check your brake rotors every few months. Look for cracks, deep grooves, or rust. Use a flashlight to see clearly. Listen for strange noises when braking. Catching problems early saves money and time.
Proper Driving Habits
Drive gently to protect your brake rotors. Avoid sudden stops or hard braking. Slow down smoothly before stopping. This reduces heat and wear on the rotors. Smooth driving extends the rotor’s life.
When To Replace Rotors
Replace rotors if they are too thin or warped. Warped rotors cause shaking when braking. Use a micrometer to measure thickness. Follow the car maker’s minimum thickness guide. Replace rotors to keep brakes safe and effective.
Frequently Asked Questions
How Do I Know When To Resurface Brake Rotors?
Resurface brake rotors if you feel vibrations or hear squealing while braking. Also, check for grooves, cracks, or warping. If rotors are below minimum thickness, replacement is necessary.
What Tools Are Needed To Resurface Brake Rotors At Home?
You need a brake lathe or rotor resurfacing tool, jack, lug wrench, socket set, and safety gear. Clean workspace and proper lighting are important for accuracy and safety.
Can Resurfacing Brake Rotors Improve Braking Performance?
Yes, resurfacing restores a smooth surface on rotors, improving brake pad contact. This reduces vibrations, noise, and extends brake pad life, ensuring safer and smoother braking.
How Long Does It Take To Resurface Brake Rotors At Home?
Resurfacing rotors typically takes 30 to 60 minutes per wheel, depending on your experience. Proper preparation and careful work ensure quality results and safety.
Conclusion
Resurfacing brake rotors at home saves money and extends rotor life. With the right tools, the task is simple and safe. Take time to follow each step carefully. Check your work to ensure smooth brakes and better driving. Regular rotor care keeps your car running well.
Try this method to maintain your brakes without costly visits. Stay patient, work slowly, and enjoy the results. Your car will thank you with safer stops and smoother rides.