
If you want to keep your vehicle running smoothly, knowing how to use a fuel filter removal tool is a must. You might think this task is complicated, but with the right steps, you can do it quickly and safely.
This guide will walk you through everything you need to know, so you can save time and avoid costly repairs. Keep reading, and soon you’ll feel confident handling your fuel filter like a pro.
Fuel Filter Removal Tool Basics
Removing a fuel filter requires the right tool to avoid damage. A fuel filter removal tool makes this job easier and safer. It helps disconnect the fuel lines without spilling fuel or hurting parts.
Using the correct tool saves time and effort. It also protects your vehicle’s fuel system. Understanding the basics of these tools is key before starting the work.
Types Of Fuel Filter Tools
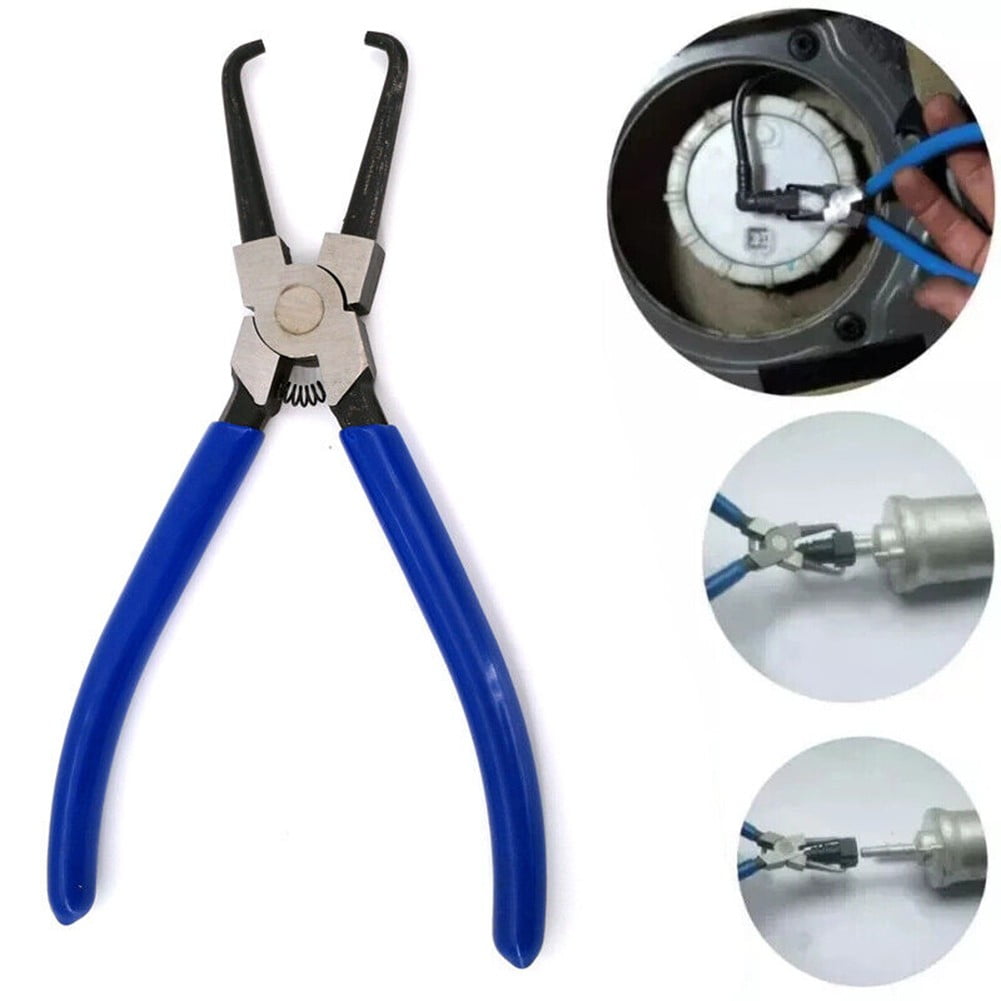
Several types of fuel filter removal tools exist. Some are simple plastic clips. Others are metal wrenches or sockets. Each type fits different fuel filter models and connections.
Quick-connect tools are common for modern vehicles. They release the locking mechanism quickly. Strap wrenches grip the filter housing tightly. Socket tools fit over the filter nut to turn it.
Choosing the right type depends on your car’s fuel system design. Knowing the options helps pick the best tool for the job.
Choosing The Right Tool
Check your vehicle’s manual for fuel filter details. Identify the type of fuel lines and filter connections. Match this information with the tool types available.
Using the wrong tool can cause leaks or damage parts. Pick a tool that fits snugly and works smoothly. Quality tools last longer and make the job easier.
Tools come in sets or single pieces. Sets cover many vehicle types. Single tools suit specific models. Choose what fits your needs and budget.
Credit: www.reddit.com
Preparing For Fuel Filter Replacement
Preparing for a fuel filter replacement is a crucial step. It ensures the process goes smoothly and safely. Proper preparation saves time and helps avoid mistakes. Knowing what to do before starting is important for every car owner. This section explains how to get ready for the job.
Gathering Necessary Equipment
Start by collecting all tools and parts needed for the task. A fuel filter removal tool is essential. You also need a new fuel filter, gloves, and safety glasses. Keep a container ready to catch spilled fuel. Have rags or paper towels handy for cleaning. Using the right tools makes the job easier and faster.
Ensuring Safety Precautions
Safety is the top priority when working with fuel. Work in a well-ventilated area to avoid inhaling fumes. Keep any open flames or sparks far from the workspace. Wear gloves to protect your hands from fuel and dirt. Safety glasses prevent fuel splashes from reaching your eyes. Disconnect the car battery before starting to reduce fire risk.
Locating The Fuel Filter
Finding the fuel filter is the first step in using a fuel filter removal tool. The fuel filter cleans dirt and rust from the fuel. It helps the engine run smoothly. Knowing where the fuel filter sits makes the removal process easier and faster.
Common Fuel Filter Locations
Fuel filters are often near the fuel tank or engine. Some cars have the filter inside the engine bay. Others place it under the car, close to the fuel tank. Some filters are inside the fuel line. Checking the car’s manual helps find the exact spot. Look for a small, metal or plastic cylinder connected to fuel lines.
Accessing The Fuel Filter
Clear the area around the filter for easy access. You may need to lift the car or remove a cover. Protect your eyes and hands before starting. Make sure the engine is cool and the car is off. Disconnect the battery to avoid sparks. Use the fuel filter removal tool carefully to avoid damage.
Using The Fuel Filter Removal Tool
Using the fuel filter removal tool makes changing your fuel filter easier and safer. It helps you avoid damage to the fuel lines and filter housing. This tool fits securely around the filter, allowing you to twist and release it smoothly. Follow these simple steps to use the tool effectively.
Attaching The Tool Properly
Place the fuel filter removal tool around the fuel filter. Make sure it fits snugly and grips the filter tightly. The tool should align with the filter’s notches or grooves. Check that the tool does not slip off when you apply pressure. A proper fit ensures easy removal without damage.
Releasing The Fuel Filter
Hold the tool firmly and twist it counterclockwise. Use steady pressure to loosen the filter from its position. Avoid sudden or forceful movements to prevent breaking the filter or fuel lines. Once loose, you will feel the filter start to turn freely. Keep turning until the filter detaches from the housing.
Removing The Old Filter
After loosening, carefully pull the old filter away by hand. Keep the tool attached if the filter is still tight. Dispose of the old filter according to local regulations. Clean the filter housing area to remove dirt and debris. This prepares the space for installing the new fuel filter.
Installing The New Fuel Filter
Installing the new fuel filter is a key step to keep your vehicle running smoothly. A proper installation ensures clean fuel flow and prevents engine problems. Follow these steps carefully to place the new filter correctly and secure it well.
Positioning The Filter Correctly
Hold the new fuel filter with the inlet and outlet ports aligned to the fuel lines. Look for arrows on the filter body that show fuel flow direction. Make sure the arrow points toward the engine. Position the filter so it fits easily without bending the fuel lines. A correct position avoids leaks and helps fuel flow smoothly.
Securing The Filter
Attach the fuel lines firmly to the filter’s ports. Use the fuel filter removal tool or clamps to tighten connections. Avoid overtightening to prevent damage. The filter should not move or wiggle after securing. A tight fit keeps the fuel system sealed and safe.
Double-checking Connections
Check all connections again before finishing. Look for any gaps or loose fittings. Gently tug the fuel lines to ensure they hold tight. Inspect the filter for correct placement and no signs of damage. Double-checking prevents fuel leaks and engine trouble.
Post-replacement Checks
After replacing the fuel filter using the removal tool, checks are important. These ensure your vehicle runs safely and smoothly. Small mistakes can cause leaks or engine problems. Taking time to inspect your work avoids future trouble.
Testing For Leaks
Look closely around the fuel filter connections. Check for any wet spots or fuel smell. Run your hand gently near fittings but avoid direct fuel contact. Even a small drip can cause issues. Fix leaks immediately before moving on.
Starting The Engine
Turn the ignition key to start the engine. Let it run for a minute or two. Listen for unusual noises like sputtering or stalling. If the engine runs smoothly, the filter is installed well. If not, check the filter and connections again.
Monitoring Fuel System Performance
Drive the vehicle for a short distance. Pay attention to how the engine feels. Notice any hesitation or loss of power. Monitor fuel efficiency in the coming days. Good performance means the filter replacement was successful.
Troubleshooting Common Issues
Troubleshooting common problems with the fuel filter removal tool helps save time and effort. Knowing what to do prevents damage and keeps your engine running well.
Below are common issues and simple fixes to make your task easier and safer.
Tool Slipping Or Not Fitting
Check the tool size before use. A wrong size causes slipping or poor grip.
Clean the fuel filter area. Dirt or grease can stop the tool from fitting well.
Apply steady pressure. Quick or uneven force makes the tool slip off.
Try a different tool if slipping continues. Some filters need special tools.
Fuel Leaks After Replacement
Inspect the filter seal for cracks or damage. A bad seal causes leaks.
Make sure the filter is properly seated. Misalignment leads to fuel leaks.
Tighten the filter firmly but avoid over-tightening. Too much force can crack parts.
Check fuel lines and connections for loose clamps or cracks.
Engine Performance Problems
Replace the fuel filter regularly to avoid clogging and poor flow.
After replacing, prime the fuel system to remove air pockets.
Listen for sputtering or stalling, signs of fuel flow issues.
Double-check connections and seals to prevent air leaks into the system.
Credit: www.walmart.com

Credit: www.youtube.com
Frequently Asked Questions
What Is A Fuel Filter Removal Tool Used For?
A fuel filter removal tool helps safely detach the fuel filter from the fuel line. It prevents damage to connectors and ensures easy replacement. Using this tool makes fuel system maintenance quicker and cleaner.
How Do You Use A Fuel Filter Removal Tool?
First, locate the fuel filter and release fuel pressure. Slide the tool onto the filter’s connector. Press or twist the tool to release the locking mechanism. Carefully pull the filter out without spilling fuel.
Can Anyone Use A Fuel Filter Removal Tool Safely?
Yes, anyone with basic mechanical knowledge can use it. Follow safety steps like depressurizing the fuel system and wearing gloves. The tool simplifies removal, reducing the risk of damaging fuel lines or connectors.
Why Should I Use A Fuel Filter Removal Tool?
It prevents damage to the fuel line fittings and connectors. The tool ensures a secure grip and smooth removal. It saves time and effort compared to manual or improper removal methods.
Conclusion
Using a fuel filter removal tool makes the job easier and safer. It helps you remove filters without damage. Always choose the right tool for your vehicle. Take your time and follow the steps carefully. This small effort keeps your engine running smoothly.
Clean fuel filters mean better performance and fewer problems. Keep this tool handy for future maintenance. Regular care saves money and avoids breakdowns. Simple tools, simple steps, great results.


